Introducing AutoRAG: fully managed Retrieval-Augmented Generation on Cloudflare
Today we’re excited to announce AutoRAG in open beta, a fully managed Retrieval-Augmented Generation (RAG) pipeline powered by Cloudflare, designed to simplify how developers integrate context-aware AI into their applications. RAG is a method that improves the accuracy of AI responses by retrieving information from your own data, and providing it to the large language model (LLM) to generate more grounded responses.
Building a RAG pipeline is a patchwork of moving parts. You have to stitch together multiple tools and services — your data storage, a vector database, an embedding model, LLMs, and custom indexing, retrieval, and generation logic — all just to get started. Maintaining it is even harder. As your data changes, you have to manually reindex and regenerate embeddings to keep the system relevant and performant. What should be a simple “ask a question, get a smart answer” experience becomes a brittle pipeline of glue code, fragile integrations, and constant upkeep.
AutoRAG removes that complexity. With just a few clicks, it delivers a fully-managed RAG pipeline end-to-end: from ingesting your data and automatically chunking and embedding it, to storing vectors in Cloudflare’s Vectorize database, performing semantic retrieval, and generating high-quality responses using Workers AI. AutoRAG continuously monitors your data sources and indexes in the background so your AI stays fresh without manual effort. It abstracts away the mess, letting you focus on building smarter, faster applications on Cloudflare’s developer platform. Get started today in the Cloudflare Dashboard!
Why use RAG in the first place?
</a>
</div>
<p>LLMs like Llama 3.3 from Meta are powerful, but they only know what they’ve been trained on. They often struggle to produce accurate answers when asked about new, proprietary, or domain-specific information. System prompts providing relevant information can help, but they bloat input size and are limited by context windows. Fine-tuning a model is expensive and requires ongoing retraining to keep up to date.</p><p>RAG solves this by retrieving relevant information from your data source at query time, combining it with the user’s input query, and feeding both into the LLM to generate responses grounded with your data. This makes RAG a great fit for AI-driven support bots, internal knowledge assistants, semantic search across documentation, and other use cases where the source of truth is always evolving.</p>
<figure>
<img src="https://cf-assets.www.cloudflare.com/zkvhlag99gkb/5zrM30iI2E1ZlmTQvAsx0D/fcef1f00b048a147fc3bc459895cc19c/1.png" />
</figure>
<div>
<h3>What’s under the hood of AutoRAG?</h3>
<a href="#whats-under-the-hood-of-autorag">
</a>
</div>
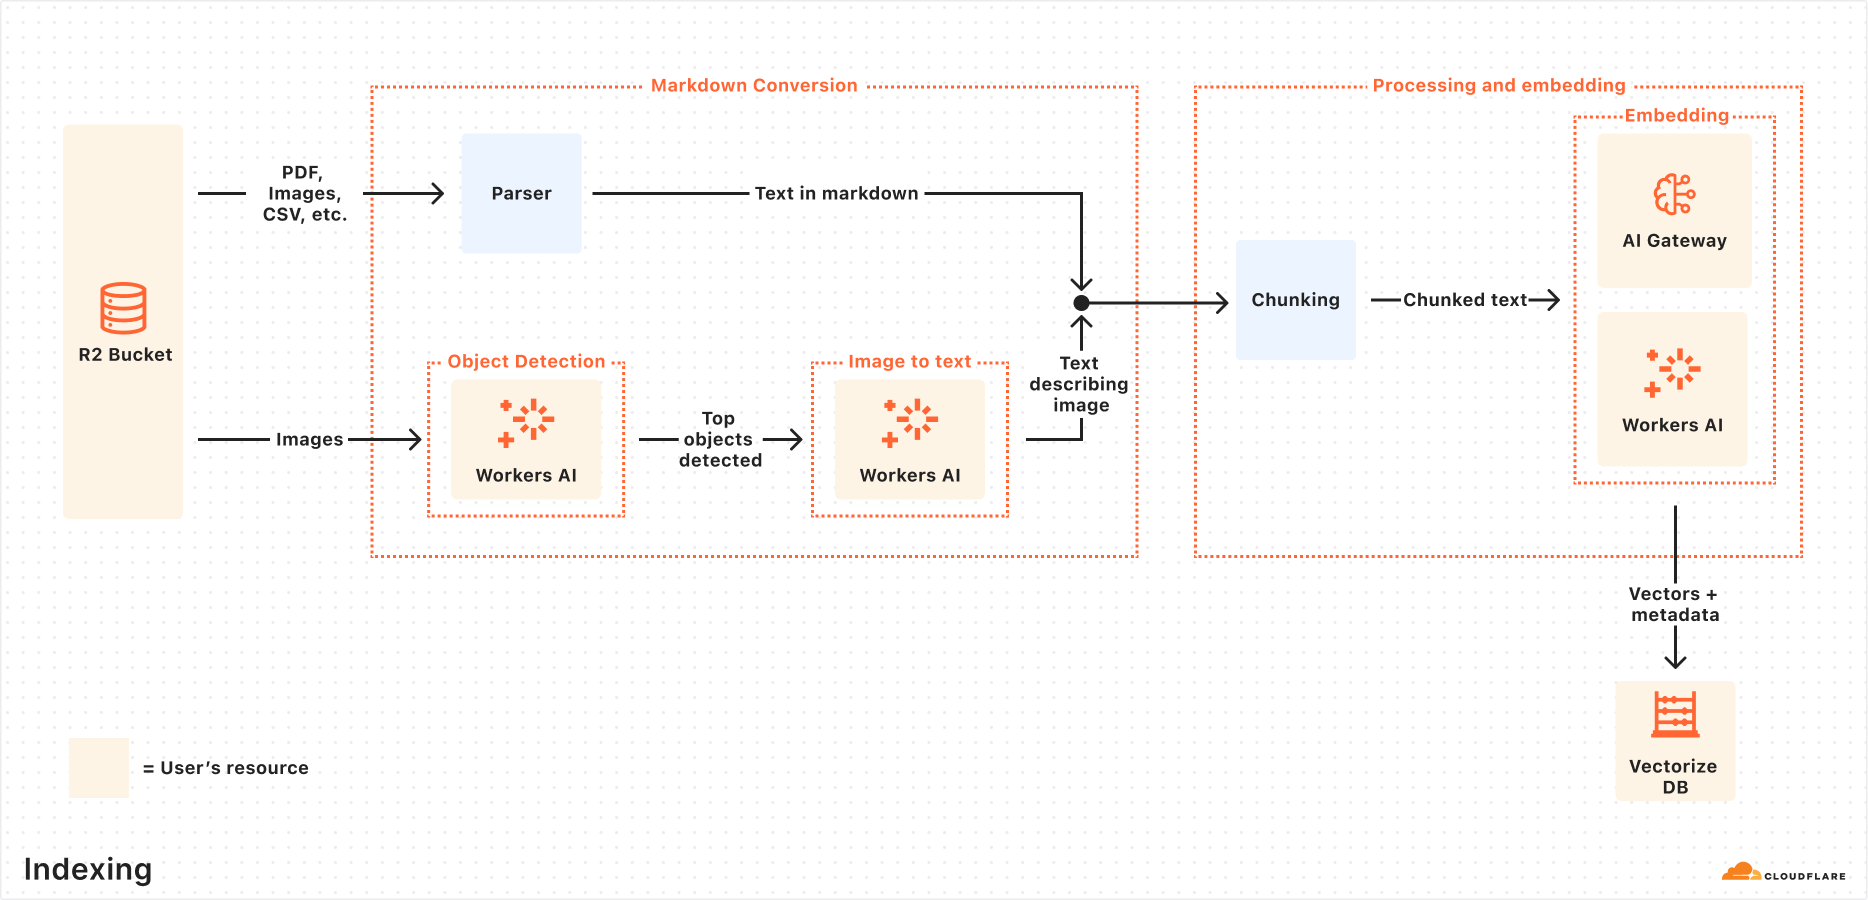
<p>AutoRAG sets up a RAG pipeline for you, using the building blocks of Cloudflare’s developer platform. Instead of you having to write code to create a RAG system using <a href="https://developers.cloudflare.com/workers-ai/"><u>Workers AI</u></a>, <a href="https://developers.cloudflare.com/vectorize/"><u>Vectorize</u></a>, and <a href="https://developers.cloudflare.com/ai-gateway/"><u>AI Gateway</u></a>, you just create an AutoRAG instance and point it at a data source, like an <a href="https://developers.cloudflare.com/r2/"><u>R2 </u></a>storage bucket.</p><p>Behind the scenes, AutoRAG is powered by two processes: <b>indexing</b> and <b>querying</b>.</p><ul><li><p><b>Indexing</b> is an asynchronous process that runs in the background. It kicks off as soon as you create an AutoRAG, and automatically continues in cycles — reprocessing new or updated files after each previous job completes. During indexing, your content is transformed into vectors optimized for semantic search.</p></li><li><p><b>Querying</b> is a synchronous process triggered when a user sends a search request. AutoRAG takes the query, retrieves the most relevant content from your vector database, and uses it to generate a context-aware response using an LLM.</p></li></ul><p>Let’s take a closer look at how they work.</p><h4>Indexing process</h4><p>When you connect a data source, AutoRAG automatically ingests, transforms, and stores it as vectors, optimizing it for semantic search when querying:</p><ol><li><p><b>File ingestion from data source: </b>AutoRAG reads directly from your data source. Today, it supports integration with Cloudflare R2, where you can store documents like PDFs, images, text, HTML, CSV, and more for processing.
Check out the RAG to riches in 5 minutes tutorial below to learn how you can use Browser Rendering to parse webpages to use within your AutoRAG.
Markdown conversion: AutoRAG uses Workers AI’s Markdown Conversion to convert all files into structured Markdown. This ensures consistency across diverse file types. For images, Workers AI is used to perform object detection followed by vision-to-language transformation to convert images into Markdown text.
Chunking: The extracted text is chunked into smaller pieces to improve retrieval granularity.
Embedding: Each chunk is embedded using Workers AI’s embedding model to transform the content into vectors.
Vector storage: The resulting vectors, along with metadata like source location and file name, are stored in a Cloudflare’s Vectorize database created on your account.
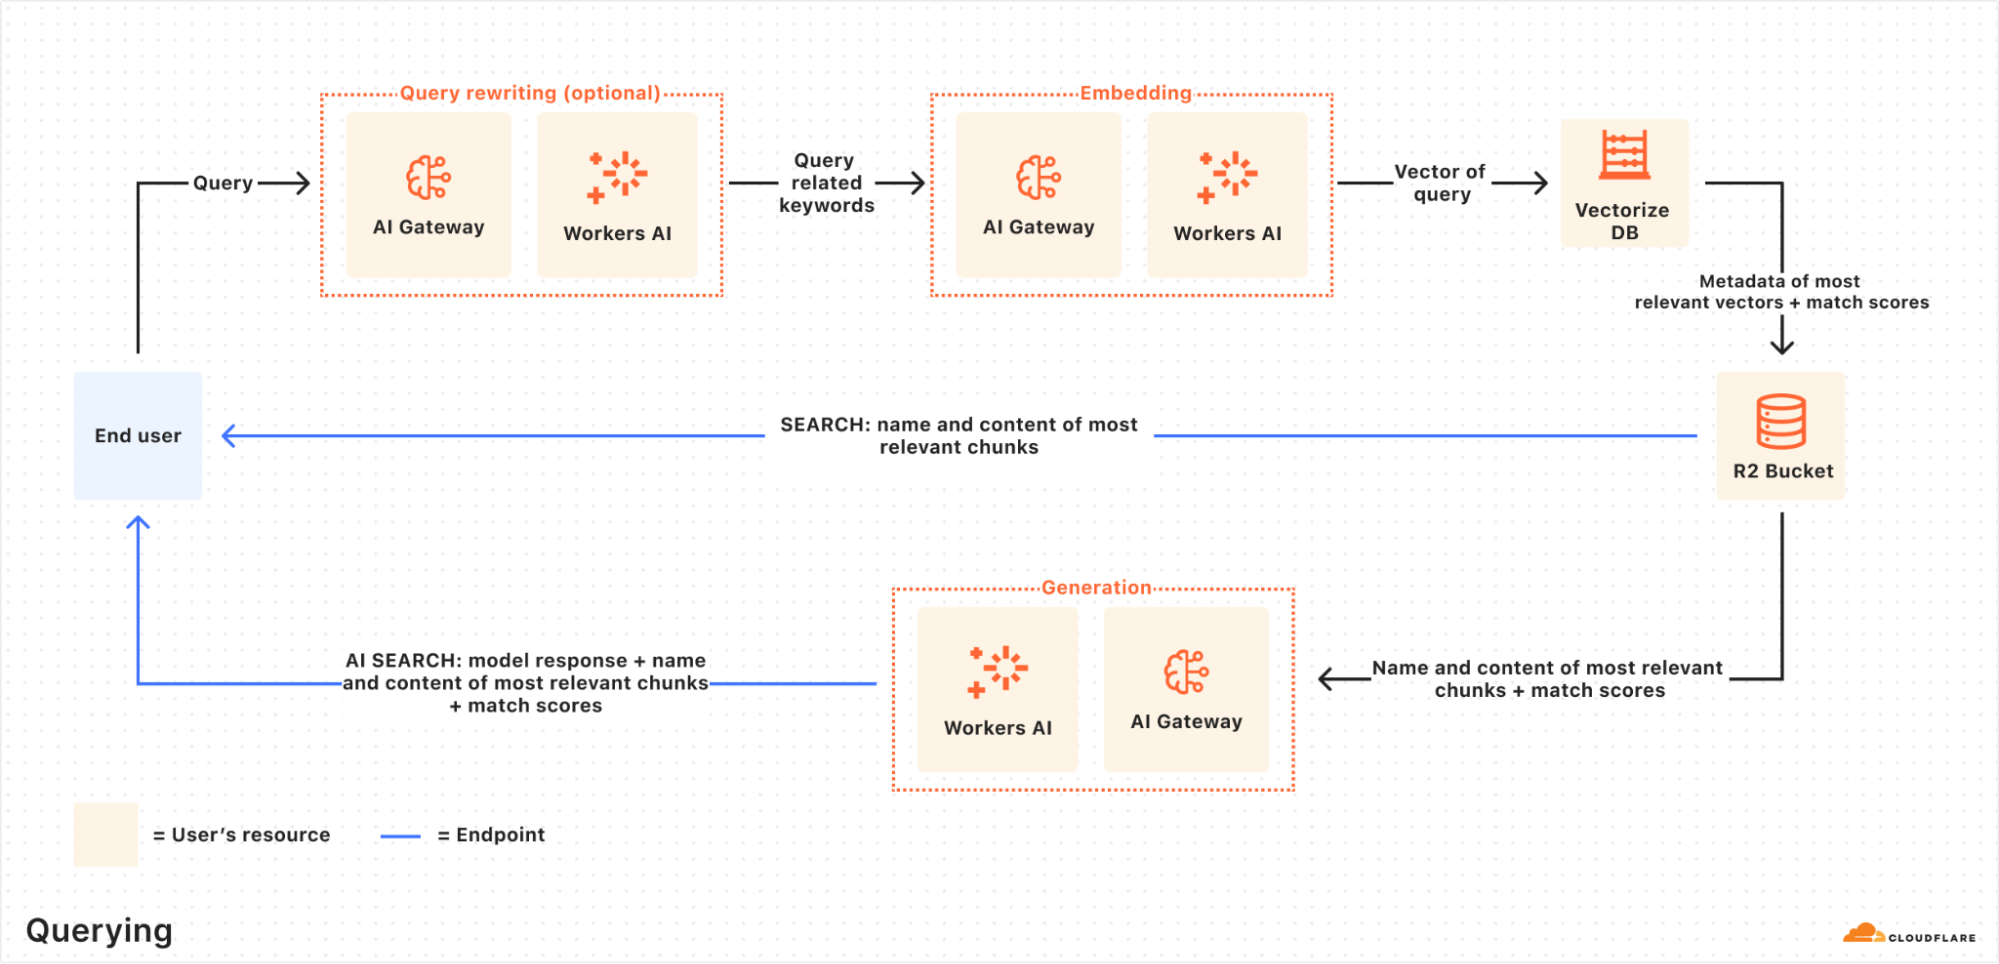
Querying process
When an end user makes a request, AutoRAG orchestrates the following:
Receive query from AutoRAG API: The query workflow begins when you send a request to either the AutoRAG’s AI Search or Search endpoint.
Query rewriting (optional): AutoRAG provides the option to rewrite the input query using one of Workers AI’s LLMs to improve retrieval quality by transforming the original query into a more effective search query.
Embedding the query: The rewritten (or original) query is transformed into a vector via the same embedding model used to embed your data so that it can be compared against your vectorized data to find the most relevant matches.
Vector search in Vectorize: The query vector is searched against stored vectors in the associated Vectorize database for your AutoRAG.
Metadata + content retrieval: Vectorize returns the most relevant chunks and their metadata. And the original content is retrieved from the R2 bucket. These are passed to a text-generation model.
Response generation: A text-generation model from Workers AI is used to generate a response using the retrieved content and the original user’s query.
The end result is an AI-powered answer grounded in your private data — accurate, and up to date.
RAG to riches in under 5 minutes
</a>
</div>
<p>Most of the time, getting started with AutoRAG is as simple as pointing it to an existing R2 bucket — just drop in your content, and you're ready to go. But what if your content isn’t already in a bucket? What if it’s still on a webpage or needs to first be rendered dynamically by a frontend UI? You're in luck, because with the <a href="https://developers.cloudflare.com/browser-rendering/"><b><u>Browser Rendering API</u></b></a>, you can crawl your own websites to gather information that powers your RAG. The Browser Rendering REST API is now<b> generally available</b>, offering endpoints for common browser actions including extracting HTML content, capturing screenshots, and generating PDFs. Additionally, a crawl endpoint is coming soon, making it even easier to ingest websites.</p><p>In this walkthrough, we’ll show you how to take your website and feed it into AutoRAG for Q&A. We’ll use a Cloudflare Worker to render web pages in a headless browser, upload the content to R2, and hook that into AutoRAG for semantic search and generation.</p><h4>Step 1. Create a Worker to fetch webpages and upload into R2</h4><p>We’ll create a Cloudflare Worker that uses Puppeteer to visit your URL, render it, and store the full HTML in your R2 bucket. If you already have an R2 bucket with content you’d like to build a RAG for then you can skip this step.</p><ol><li><p>Create a new Worker project named <code>browser-r2-worker</code> by running:</p></li></ol>
<pre><code>npm create cloudflare@latest -- browser-r2-worker</code></pre>
<p>For setup, select the following options:</p><ul><li><p><i>What would you like to start with?</i> Choose Hello World Starter.</p></li><li><p><i>Which template would you like to use?</i> Choose Worker only.</p></li><li><p><i>Which language do you want to use? </i>Choose TypeScript.</p></li></ul><p>
- Install
@cloudflare/puppeteer, which allows you to control the Browser Rendering instance:npm i @cloudflare/puppeteer3. Create a new R2 bucket named
html-bucketby running:npx wrangler r2 bucket create html-bucket4. Add the following configurations to your Wrangler configuration file, so your Worker can use browser rendering and your new R2 bucket:
{
“compatibility_flags”: [“nodejs_compat”],
“browser”: {
“binding”: “MY_BROWSER”
},
“r2_buckets”: [
{
“binding”: “HTML_BUCKET”,
“bucket_name”: “html-bucket”,
}
],
}
5. Replace the contents of src/index.ts with the following skeleton script:
import puppeteer from “@cloudflare/puppeteer”;
// Define our environment bindings interface Env { MY_BROWSER: any; HTML_BUCKET: R2Bucket; }
// Define request body structure interface RequestBody { url: string; }
export default { async fetch(request: Request, env: Env): Promise<Response> { // Only accept POST requests if (request.method !== ‘POST’) { return new Response(‘Please send a POST request with a target URL’, { status: 405 }); }
	// Get URL from request body
	const body = await request.json() as RequestBody;
	// Note: Only use this parser for websites you own
	const targetUrl = new URL(body.url);

	// Launch browser and create new page
	const browser = await puppeteer.launch(env.MY_BROWSER);
	const page = await browser.newPage();

	// Navigate to the page and fetch its html
	await page.goto(targetUrl.href);
	const htmlPage = await page.content();

	// Create filename and store in R2
	const key = targetUrl.hostname + '_' + Date.now() + '.html';
	await env.HTML_BUCKET.put(key, htmlPage);

	// Close browser
	await browser.close();

	// Return success response
	return new Response(JSON.stringify({
		success: true,
		message: 'Page rendered and stored successfully',
		key: key
	}), {
		headers: { 'Content-Type': 'application/json' }
	});
}
} satisfies ExportedHandler<Env>;
6. Once the code is ready, you can deploy it to your Cloudflare account by running:
npx wrangler deploy7. To test your Worker, you can use the following cURL request to fetch the HTML file of a page. In this example we are fetching this blog page to upload into the html-bucket bucket:
curl -X POST https://browser-r2-worker.<YOUR_SUBDOMAIN>.workers.dev

-H “Content-Type: application/json”

-d ‘{“url”: “https://blog.cloudflare.com/introducing-autorag-on-cloudflare"}'
Step 2. Create your AutoRAG and monitor the indexing
Now that you have created your R2 bucket and filled it with your content that you’d like to query from, you are ready to create an AutoRAG instance:
In your Cloudflare dashboard, navigate to AI > AutoRAG
Select Create AutoRAG and complete the setup process:
Select the R2 bucket which contains your knowledge base, in this case, select the
html-bucket.Select an embedding model used to convert your data to vector representation. It is recommended to use the Default.
Select an LLM to use to generate your responses. It is recommended to use the Default.
Select or create an AI Gateway to monitor and control your model usage.
Name your AutoRAG as
my-rag.Select or create a Service API token to grant AutoRAG access to create and access resources in your account.
Select Create to spin up your AutoRAG.
Once you’ve created your AutoRAG, it will automatically create a Vectorize database in your account and begin indexing the data. You can view the progress of your indexing job in the Overview page of your AutoRAG. The indexing time may vary depending on the number and type of files you have in your data source.
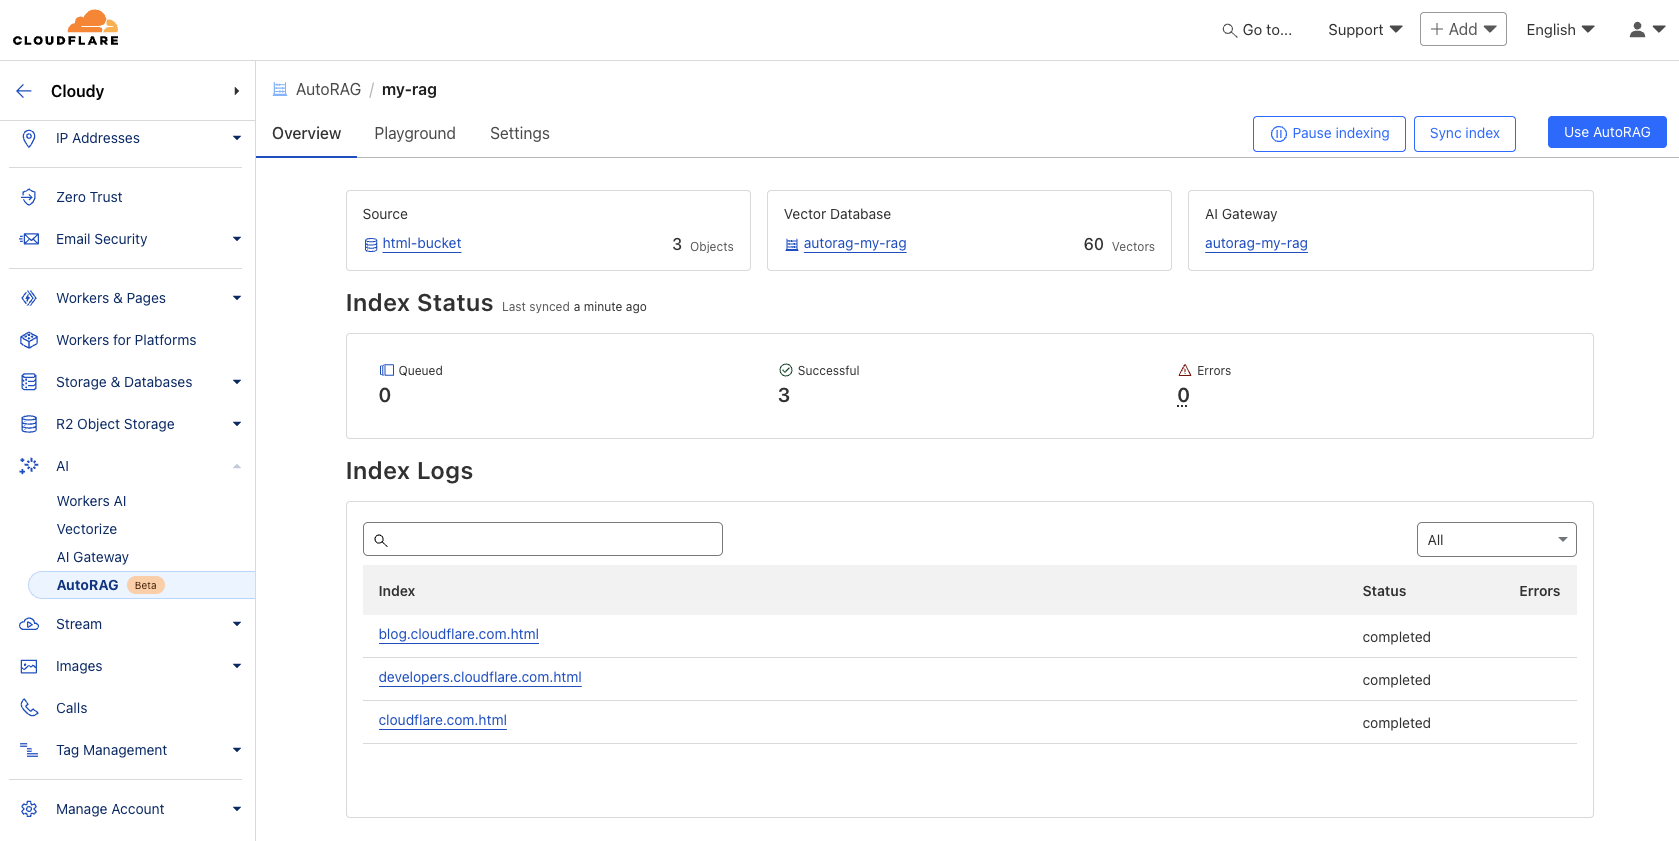
Step 3. Test and add to your application
Once AutoRAG finishes indexing your content, you’re ready to start asking it questions. You can open up your AutoRAG instance, navigate to the Playground tab, and ask a question based on your uploaded content, like “What is AutoRAG?”.
Once you’re happy with the results in the Playground, you can integrate AutoRAG directly into the application that you are building. If you are using a Worker to build your application, then you can use the AI binding to directly call your AutoRAG:
{
“ai”: {
“binding”: “AI”
}
}
Then, query your AutoRAG instance from your Worker code by calling the aiSearch() method. Alternatively you can use the Search() method to get a list of retrieved results without an AI generated response.
const answer = await env.AI.autorag(‘my-rag’).aiSearch({
query: ‘What is AutoRAG?’
});
For more information on how to add AutoRAG into your application, go to your AutoRAG then navigate to Use AutoRAG for more instructions.